Jekyll with free SSL on Digitalocean
Couple of days ago I’ve decided to start blogging again. Past decade and a half I had a lot of success with writing blogs and people seamed to love it. For some unknown reason, I’ve decided to do it again and past few days I’ve been trying various things, one among them was surge.sh and while I initially found it awesome, what made me unintersted is their pricing and lack of custom configuration I could do.
For that reason, I’ve decided to go back to my good-old DigitalOcean and revoke some of my old skills with creating easy-to-deploy Jekyll aka static blogs.
In this article, I’ll show you how to create your own Jekyll blog which will rebuild and deploy your new posts every time you push a commit to your droplet repository. In fact, after your finish with this article, publishing will be easier and faster then with surge.sh. You will type in 4 characters in your local terminal and your jekyll site will be online. Pretty cool, right ?
So, let’s get started.
In this guide, I will be using DigitalOcean but this will pretty much work with any hosting provider.
Prerequisites
- Access to virtual/dedicated server e.g. DigitalOcean, Hetzner etc.
- Shell access, basic shell commands
Let’s begin
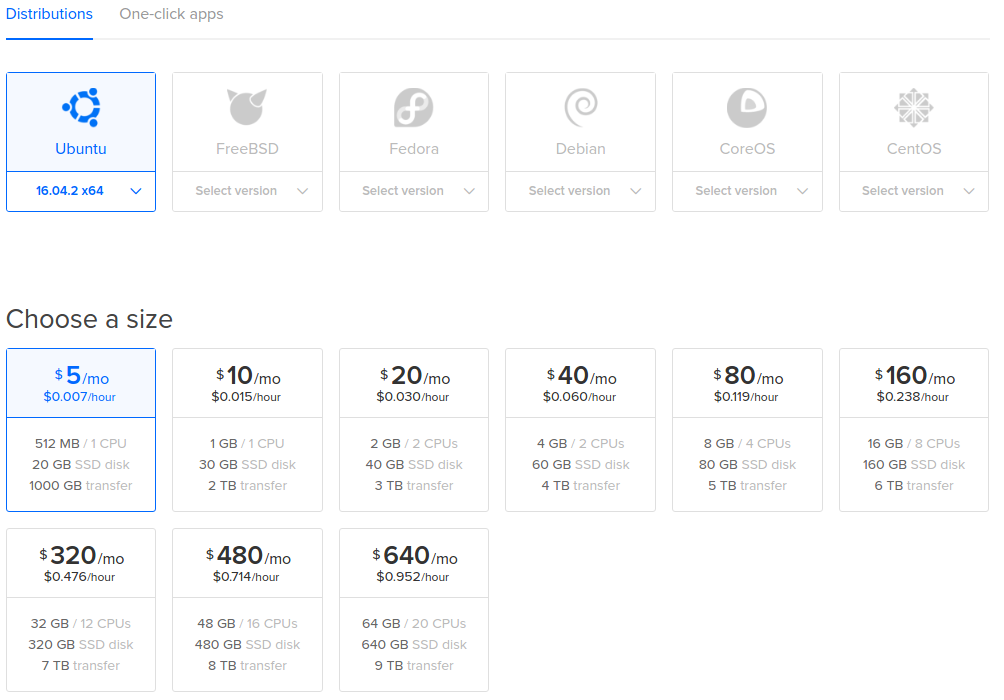
Go ahead to the Droplet creation page and select Ubuntu 16. I suggest you to start with $5 per month droplet and increase the size as your reader base increases.
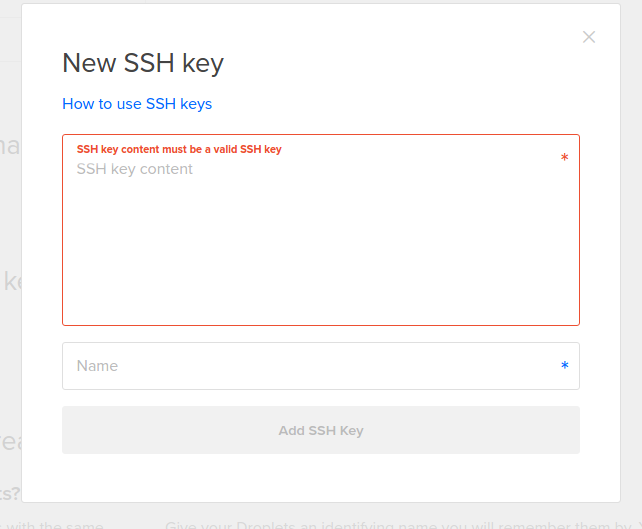
While on the droplet creation page, make sure to add your local’s computer SSH key so you can access your droplet.

To copy the existing ssh key from your computer (Linux & mac), type the following in your local’s computer terminal:
$ xclip -sel clip < ~/.ssh/id_rsa.pub
This command will copy the RSA key to clipboard and now you can paste it to the droplet creation page and give it an appropriate name and click on “Add SSH Key”.
If you whatsoever don’t have an SSH key generated on your local machine, you need to generate one.
ssh-keygen -t rsa -b 4096 -C “[email protected]”
When the process asks you to enter which file you want to save it to, just press enter and it will save it to the default location. Then, select a passphrase. While not enforced, I suggest you to create one. Passphrase is like a password that you will need to enter when pushing/pulling from your Git.
With SSH keys, if someone gains access to your computer, they also gain access to every system that uses that key. To add an extra layer of security, you can add a passphrase to your SSH key. You can use ssh-agent to securely save your passphrase so you don’t have to reenter it.
Now add the key to your SSH agent
ssh-add ~/.ssh/id_rsa
In case you aren’t aware of the term “ssh-agent”, ssh-agent is a program that holds private keys used for public key authentication (RSA, DSA, ECDSA).
Anyway, in case you haven’t had your key before and you just generated it, scroll up to the “add key” part and do the necessary steps.
SSH to your droplet
If previous steps were successful, it’s time to connect to our droplet.
ssh root@youDropletIp
Congrats! You are now connected to your droplet. First thing we need to do is make sure that our Ubuntu is updated. Let’s go ahead and run our application manager:
apt-get update
Since we are building a Jekyll blog and since Jekyll is written in Ruby language, we’ll need to install Ruby. We will not install Ruby directly but a little helper tool called rvm (Ruby version manager). With rvm, we can switch between different versions of Ruby.
Let’s go ahead and install rvm and Jekyll afterwards
$ gpg --keyserver hkp://keys.gnupg.net --recv-keys 409B6B1796C275462A1703113804BB82D39DC0E3

$ \curl -sSL https://get.rvm.io | bash
# install RVM (development version)

$ rvm get head
# Make Sure RVM up to date

$ rvm install ruby
# will install latest version of ruby

$ rvm list
# Listing install rubies will you get versions of ruby which is installed by RVM

$ rvm use < ruby-version >
# for instances ruby-1.9.3-p125

$ gem install jekyll
Awesome! We got one step further. Now we have both, Ruby and Jekyll installed. Next thing we need is Git.
We’ll use Git to create a repository on our droplet that we will push new posts to. We will also create a webhook which will rebundle our Jekyll for every new change.
Webhooks allow you to build apps which subscribe to certain events. When one of those events is triggered, webhook responds by executing a given script. In our case, whenever we push to a repository on our droplet, script for building Jekyll will execute.
Now when you are familiar with what a webhook is, let’s go ahead and install Git.
apt-get install git-core
Let’s create a repository that we will push to from our localhost. This will be an origin with a webhook configured. Every time we push to it, webhook will trigger a script which will bundle our jekyll files and move the _site folder into appropriate folder which will then be served by our nginx.
$ cd ~/
$ mkdir projects && cd projects
$ mkdir yourBlogName.git && cd yourBlogName.git
$ git init --bare
In relation to this, next step is creating a webhook we previously mentioned. This webhook will execute a script which will execute whenever we push to our repository.
cd hooks
# lets change directory to the hooks folder which was initially created by git init --bare
touch post-receive
# lets create a file which will hold our script
vim post-receive
# lets open the file where we will paste the script
Now, we are ready to paste in the following script
#!/bin/bash -l
GIT_REPO=$HOME/projects/yourBlogName.git
TMP_GIT_CLONE=$HOME/tmp/git/yourBlogName
PUBLIC_WWW=/var/www/yourBlogName

git clone $GIT_REPO $TMP_GIT_CLONE
jekyll build --source $TMP_GIT_CLONE --destination $PUBLIC_WWW
rm -Rf $TMP_GIT_CLONE
exit
In short, this script will ensure that each time we push to our digitalocean repository, our jekyll will rebuild and move the contents to appropriate folder on our server.
Let’s analyze line by line what’s our script doing.
GIT_REPO=$HOME/projects/yourBlogName.git
TMP_GIT_CLONE=$HOME/tmp/git/yourBlogName
PUBLIC_WWW=/var/www/yourBlogName
First, we create the variables with appropriate paths that our script will use.
GIT_REPO
This variable points to the directory where we initially created our bare git repository.
TMP_GIT_CLONE
This variable points to a directory which will be used temporary for holding our blog assets during the build proces (jekyll build)
PUBLIC_WWW
This variable points to the final directory where our files will be moved. This is a directory on our server that nginx will use to serve our static files. Mostly, this is a root directory where all our websites are, in case we have more then one.
git clone $GIT_REPO $TMP_GIT_CLONE
jekyll build --source $TMP_GIT_CLONE --destination $PUBLIC_WWW
rm -Rf $TMP_GIT_CLONE
exit
This portion is an actual script and as you can see, it’s really simple. This script will clone the repository each time we do a new push, it’s gonna move it to the temporary folder and execute the commands below.
As you can see, we are running jekyll build with two commands, first one is the –source which tells jekyll where the files for building are and the destination which determines where to save the built files, in our case, /var/www/yourBlogName.
Now, after pasting the script into the post-receive file, save it and give it proper executable permissions.
chmod +x post-receive
This will ensure that our system has necessary permissions to execute this file.
If you have done all the steps from the above, switch back to your local computer and add a git origin to your new or existing repository.
Simply cd to your local lepository and run:
git remote add droplet ssh://username@dropletIp/root/repos/yourAwesomeBlog.git
Keep in mind that this command will work over SSH using the droplet’s ip address. If you want to do it using your user/domain account, you can run the following command:
git remote add droplet [email protected]:repos/yourAwesomeBlog.git
Now, it’s time to push to our droplet master.
git push droplet master
What I like to do when I’m working with git is create aliases. Every time you create a new post, you will need to add the files, commit them and push them to appropriate branch, therefor, it will over time become annoying to do that.
Let’s create a script which will make this process more natural.
In your server terminal, type the following:
vim ~/.bashrc
Scroll to the bottom of the file where we will create a custom function that we will run every time we want to push a new post to our server.
alias function gpnp() {
    git add . && git commit -m "Created a new post with name "+$ && git push droplet master
}

alias gpnp=gpnp;
Now, whenever you create a new post, you can simply push it to your server by typing in your terminal :
gpnp “post name”
The alias gpnp simply means “Git push new post” but you can give it any name you like, its completely optional.
Setting up nginx to serve our files
Now when you are done with the whole jekyll process, you are probably wondering how to serve those files to your desired domain.
First, we need to install nginx, server which will serve our static files and also offer various other services like load balancing, caching etc.
Let’s go back to our terminal and install nginx:
sudo apt-get update
sudo apt-get install nginx
After the installation is successful, let’s start the nginx service and check if the service is running:
sudo service nginx start
# start nginx
sudo service nginx status
# check if nginx is running
If you remember from our script, we told our jekyll build to store the built files into /var/www/yourBlogName. Now, we need to tell our static server aka nginx to serve files from that directory.
Luckily, that is very easy due to very explicit nginx configuration.
In your terminal, type the following:
sudo vim /etc/nginx/sites-enabled/default
This will open up a default nginx configuration where we will setup our own values. In the file, find the following:
/var/www/html
and make sure to change it to
/var/www/yourBlogName
This is where we are telling nginx to serve files from our blog directory.
While in the same file, there’s one little thing we need to change and that is the server_name value. This value simply tells nginx the name of your custom domain name, e.g. example.com.
So, find the line which says
server_name
and add your custom domain
server_name yourBlogDomain.com;
If everything worked well, restart your nginx server by typing
nginx -s reload
Now, simply go to your browser and try to access your website by typing in the custom url.
Letsencrypt SSL
Letsencrypt is a free SSL provider. Google’s algorithms started punishing site owners for not having SSL enabled and having it for free is a blessing.
So, let’s install the letencrypt
sudo apt-get install letsencrypt
Now, let’s create our unique certificate. Keep in mind that the provided snippet needs to be adjusted with the accurate values:
- –webroot-path place where our script moved files after building (/var/www/yourBlogName)
- –email [email protected]
- -d yourBlogName.com
sudo letsencrypt certonly --webroot --webroot-path /var/www/yourBlogName --renew-by-default --email [email protected] --text --agree-tos -d yourBlogName.com
Make sure that the above script has accurate values and then execute it in your terminal.
Another command we will run will generate a Diffie-Hellman group file which will prevent Longjam Attacks.
The Logjam attack allows a man-in-the-middle attacker to downgrade vulnerable TLS connections to 512-bit export-grade cryptography. This allows the attacker to read and modify any data passed over the connection.
If you are not familiar with the term Man-in-the-middle attack, the following explanation might help:
In computer security, a man-in-the-middle attack (MITM) is an attack where the attacker secretly relays and possibly alters the communication between two parties who believe they are directly communicating with each other.
Let’s go ahead and generate a key:
cd ~
# Keep in mind that its up to your where you want to store the .pem file. In our exame, we will store it under home directory

openssl dhparam -out dhparams.pem 2048
After the .pem file has been generated, it’s time to go back to our nginx configuration and set some SSL rules.
sudo vim /etc/nginx/sites-enabled/default
Our configuration file is separated in two parts, the one for connections over http and the other one for connections over https. We care about the other part.
If you have followed this entire tutorial, only thing you need to change below are the occurrences of yourBlogName
server {
        listen 443 ssl;
        server_name yourBlogName.com;

        ssl_certificate /etc/letsencrypt/live/yourBlogName/fullchain.pem;
        ssl_certificate_key /etc/letsencrypt/live/yourBlogName/privkey.pem;

        ssl_session_timeout 5m;
        ssl_protocols TLSv1 TLSv1.1 TLSv1.2;
        ssl_ciphers 'ECDHE-RSA-AES128-GCM-SHA256:ECDHE-ECDSA-AES128-GCM-SHA256:ECDHE-RSA-AES256-GCM-SHA384:ECDHE-ECDSA-AES256-GCM-SHA384:DHE-RSA-AES128-GCM-SHA256:DHE-DSS-AES128-GCM-SHA256:kEDH+AESGCM:ECDHE-RSA-AES128-SHA256:ECDHE-ECDSA-AES128-SHA256:ECDHE-RSA-AES128-SHA:ECDHE-ECDSA-AES128-SHA:ECDHE-RSA-AES256-SHA384:ECDHE-ECDSA-AES256-SHA384:ECDHE-RSA-AES256-SHA:ECDHE-ECDSA-AES256-SHA:DHE-RSA-AES128-SHA256:DHE-RSA-AES128-SHA:DHE-DSS-AES128-SHA256:DHE-RSA-AES256-SHA256:DHE-DSS-AES256-SHA:DHE-RSA-AES256-SHA:AES128-GCM-SHA256:AES256-GCM-SHA384:AES128-SHA256:AES256-SHA256:AES128-SHA:AES256-SHA:AES:CAMELLIA:DES-CBC3-SHA:!aNULL:!eNULL:!EXPORT:!DES:!RC4:!MD5:!PSK:!aECDH:!EDH-DSS-DES-CBC3-SHA:!EDH-RSA-DES-CBC3-SHA:!KRB5-DES-CBC3-SHA';

        ssl_prefer_server_ciphers on;
        ssl_session_cache shared:SSL:10m;
        ssl_dhparam /root/dhparams.pem;


        root /var/www/yourBlogName

        index index.html index.htm index.nginx-debian.html;

        location / {
                try_files $uri $uri/ =404;
        }
}
If everything went fine, you should be able to restart the nginx:
sudo nginx -s reload
Since Letsencrypt certificates last for around 90 days, it can become annoying renewing them manually. We’ll add a cron job which will handle this for us automatically.
The software utility Cron is a time-based job scheduler in Unix-like computer operating systems. People who set up and maintain software environments use cron to schedule jobs (commands or shell scripts) to run periodically at fixed times, dates, or intervals. … cron is most suitable for scheduling repetitive tasks.
Let’s go ahead and add a new cron job
sudo crontab -e
and paste in the following to the bottom of the file
30 2 * * 1 /home/deploy/.local/share/letsencrypt/bin/letsencrypt renew
There we go. From now on, your certificate will renew automatically and you won’t need to think about it yourself. If
you followed all the steps carefully, you should have an awesome blog up and running with a free SSL.
From now on, you can simply create a new post or update anything regarding your blog and use the alias we initially created to push it live.
gpnp “some commit message here”
Well done champion! We have gotten to the end. If you had any difficulties follogwing the guide, please write it in a comment section so I can improve that specific part and make this guide as easy to follow as possible. If you think there’s some section missing, use the comment section for that.